


Affordable Playroom Makeover - Renter Friendly!
- Hailey

- Jun 28, 2020
- 4 min read
This turned into a MONSTER of a project, but my DIY playroom makeover is finally complete! 5 and a half weeks and a few gray hairs later, and my daughter has a room she can't seem to get enough of. Mission accomplished✔️

If you want the full tour, there's a video on my YouTube channel. Click here.
We've got a lot to get through so let's get started! We'll take the room a section at a time and I'll share as much about the space as I can.

The DIY art hanger frames are my husband's favorite part of this room. I have to admit, they did turn out so well! For the post on how to make them, click here.
The heart garland is currently for sale on my Etsy shop. The colorful pieces of wall decor add such a whimsical element to the space that I absolutely love!
My dad made the bookshelves for us. This photo ledge tutorial is very similar, but ours has side walls! Perfect for storing books.
That ultra-plush and comfy floor cushion? It's a dog bed😎 Our doggo wouldn't use it so I pulled it out of the closet, washed it, and now it's the perfect floor cushion for my daughter's reading nook!
If you want to see how I made (yes, made!) this rug, watch the room makeover video! My best idea ever? Maybe!

This corner of the playroom is a work in progress. Actually, our playroom will transform into a bedroom once we complete our next project for this space, which is building my daughter a bed frame. Tutorial coming soon, hopefully!
For now, we have the crib mattress on the ground with colorful throw pillows piled high. I made all of these, so if you'd like a tutorial on any of them, let me know! The rainbow, strawberry, and lemon pillows are all currently available on my Etsy shop.
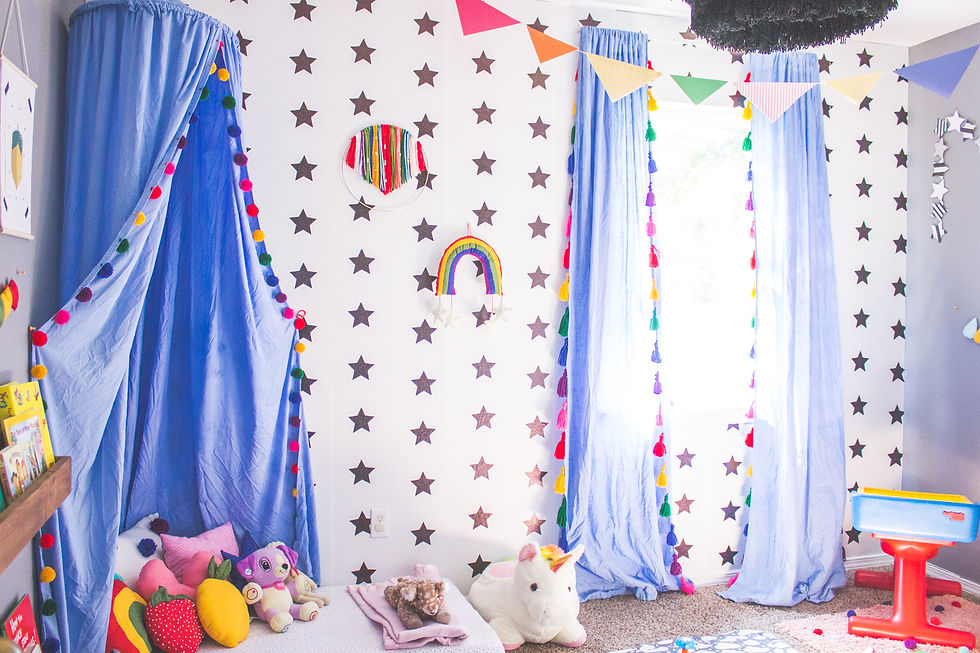
This canopy is definitely a statement piece in the room, and let me tell you, it was SO difficult for me to make. I went in completely blind and ended up spending more money and WAY more time than necessary. I'm determined to perfect the pattern and my supplies list, and a tutorial on how to make your own will follow! This one was made out of 2 twin size flat sheets dyed with Rit Dye More in the shade Sapphire Blue and the pom poms are made out of yarn.

Can you believe this entire wall of wallpaper cost me less than $30?? I have a post and video already up on how you can make it! It's a little hack I hatched up when I found out how expensive peel and stick wallpaper is. I made this wallpaper myself and I couldn't love it more! It ties the entire room together and I can't picture this space without it.
The curtains were dyed to match the canopy and I used the same yarn colors, but made tassels instead of pom-poms.
The banner hanging from the ceiling is made from scrapbook and construction paper! I plan to make a fabric or felt one in the future, but this will work for now.

We're calling this the 'art corner', and it's definitely my daughter's favorite part of the room! She loves sitting at the little desk and coloring.
Want to know how to make your own wall easel? It's super affordable and easy to do! Find my post on it here.
The art display hanger was a project I threw together last minute, but I ended up loving it! If you'd like to see how to make your own, let me know!
The colored raindrop garland is currently up for sale on my Etsy shop. I have 18 different colors you can choose from!
The black and white star garland was an incredibly easy project. I just cut stars out of thin cardboard and glued scrapbook paper on them, then hot glued them to some fishing line. Cheap and cute!
The art supplies cans may be my favorite thing I made for this room (so random). I'll have a post up on how you can make your own because they're so easy and completely customizable, and you probably already have the supplies to make them in your house!

This is our 'toy corner,' and it's a work in progress. Eventually I'd like to build a toy kitchen to go here and add some more shelves to hold the larger toys, but for now, this is what we're working with.
The black stripes on the wall are just black duct tape. Duct tape and washi tape are great products to use for a DIY accent wall!
If you want to know how to make your own 'PLAY' sign (or whatever word you'd like), read this post here.
For the frames on the wall, I simply hot glued a piece of rope to the back of a photo frame. Easy upgrade and so cute!
The toy box is just a cardboard box wrapped in fabric. Want to see a post on it? Let me know!
And that's it you guys! 5.5 weeks of my blood, sweat, and tears wrapped up into one blog post 😆 If there's anything you'd like to see more of that I didn't cover, let me know and I'll make a post on how you can DIY it!
Would you have this room in your home? It's bold and colorful, which isn't everyone's cup'o tea, but we love it and it goes perfectly in our space! Most importantly, my daughter loves it and it's a perfect reflection of her feisty personality.
For more pictures, follow my Instagram @hailsbellsblog. If you'd like to follow my shop's Instagram, it's @shopfernandjack. My Etsy store can be found here.
Thank you all so much for taking the time to read. I'll see you in the next one!
Hailey


Comments